After ten complete wraps around the footstool, I like to start stuffing the space created between the top layer and the bottom layer. You can use several items for stuffing . I used triangular pieces of cardboard with this project, but you can also use kraft brown paper (the type used for brown lunch bags). Crumple it up real well before using it for stuffing. It makes it easier to use. I have seen seats stuffed with straw, pieces of cloth, and even the moss from a Cyprus tree. After every ten wraps or so, stuff the space to keep the seat firm. Coninue wrapping and stuffing until you run out of space on the side rails.
Friday, December 23, 2011
Wednesday, December 21, 2011
Over and under and over and under, across and over and under and over......
I like to do a wrap of the rush cord completely around the stool and then come back and pull everything tight, clamping off on the back rail. 

So, wrap the cord over the top of the front rail at the far left and come under, up through the center of the stool.
Next, wrap the cord over the top of the left rail come under, up through the center of the stool.
Next, go across the front of the stool and wrap the cord over the top of the right rail at it's very end. Come under and up through the center of the stool. Then, go over the top of the front rail, at it's far right end, and under and up through the center of the stool, across to the back rail at it's far right end. Go over the top of the back rail at it's far right end, coming up through the center of the stool and then over the top of the right rail at it's very top. Now, go under the right rail and across the back of the stool to the top of the left rail. Wrap over the top of the left rail, under and up through the center of the stool, then over the top of the back rail next to where you tied off to start. Come up through the center of the stool. Now that you have made a complete wrap, go back and pull the rush cord as tight as possible all the way around. Clamp off your first run on the back rail.
Repeat the process for ten (10) complete wraps.
Tuesday, December 13, 2011
Monday, December 12, 2011
Add a roll of fiber rush and a few extra tools...
Now that the foot stool is clean and free of all obstacles, add a roll of #5 kraft brown fiber rush and the following additional tools: a quick release hand clamp ( your most important tool for this job), an awl, a flat head screwdriver with a large head, and a small hammer. Get ready. Get set.....


Monday, December 5, 2011
Thursday, December 1, 2011
Tuesday, November 29, 2011
Monday, November 28, 2011
Sunday, November 27, 2011
Did you notice?
I don't know if you noticed from the previous pictures, but this chair has a most unusual back. I've never come across one quite like it in the twenty odd years I've been caning and weaving chairs. It is woven from the back ....
through the thickness of the back's frame.
and from the front...
at the same timethrough the thickness of the back's frame.
What a challenge!
and
WHAT A CHAIR !
Monday, November 14, 2011
Sunday, November 13, 2011
The Final Step... Laying the binder cane
Finally, you will take a piece of binder cane and lay over the top of the exposed holes. I'm using a 2MM/4MM piece on this chair. Taking a strand of cane, go up through a hole, over the binder cane and down into the same hole, pulling tight in both directions. Then, move to the next hole and and repeat all around.
Saturday, November 12, 2011
Tuesday, November 8, 2011
Sunday, November 6, 2011
Saturday, November 5, 2011
Thursday, November 3, 2011
Tuesday, November 1, 2011
Monday, October 31, 2011
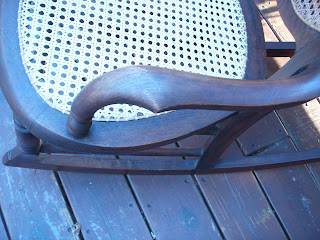
Look at those arms!
This was a chair I fell in love with right away. The arms are magnificent. Sculpted from one piece of mahogany wood, each turned with two rounds on one end and a precision crafted end that fits smoothly into the frame of the back of the rocker. It came from Pulaski, VA. The seat I wove using narrow medium cane.
Friday, October 14, 2011
Recent Students from Chestnut Creek School f the Arts in Galax, VA


I taught another 1/2" flat reed, herringbone pattern seat weaving class a few weeks ago and wanted to share my proud student's completed chairs. They were a great group to work with and everyone had a fun time. I may have another class coming up in November. Call the Chestnut Creek School of the Arts at 276-236-3500 for confirmation and registration. I think there may be a few spaces left. From top to bottom, Ray Epperly, Judith Seay, Mickey Cunningham, Donna Rosenbaum, and Tina Cunningham.
Sunday, October 2, 2011
Subscribe to:
Posts (Atom)


